|
|
|
|
|
|
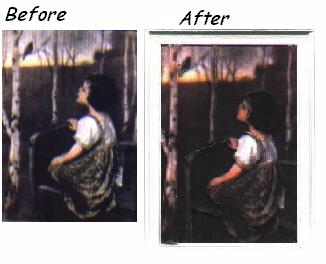
3-Dimensional Tole Framed Pictures ~~~~~~~~~~~ Tole is using 3 or more of the same print and cutting two prints into separate sections and gluing one directly on top of the other in order to form a real three dimension print.
Making the Picture… *Choose
which print will be the bottom print and set it aside. *The
second print you should cut out prominent features of the print, such as all the
sections that are up close in the picture. *As
in this print, the face, hair, jumper, blouse, arm, hand, dress, the 3 trees. *Cut
these items out separately from one another. Such as cutting the face separate
from the hair…the blouse from the jumper. The trees are cut out separately
also. The far away trees are not cut out as they are in the distant background.
The bird is cut out also. *The
rule of thumb for this kind of project is that for the objects in the
foreground, you will want to cut 2 each…such as the dress in the final picture
is three layers {counting the bottom flat picture}, the face is 2 layers, the
hair is three layers. The larger tree on the left is three layers; the tree on
the right is two layers. The bird is two layers.
The bench edges only are cut out also with two layers. The farther away
the object is the less layers and the objects in the complete background need no
layering. {the far distant trees and the horizon} *Cut
out the objects of the first layer. *Squeeze
out a small amount of silicone glue onto a piece of paper. *Pick
up the picture section you have cut out and dab carefully into the glue. Make
sure you have glue on at least the top middle and bottom of the section. It is
not necessary to cover the entire back of the section. Silicone glue “peaks”
when you pull away and that is fine, no need to remove it because when you apply
it to the picture, it will flatten… *VERY
IMPORTANT… when applying each layer of picture cut outs with glue …DO
NOT completely press them down onto the bottom print…you do want it to be
“raised” above the print. That is why you use silicone glue as it is very
flexible and adjustable. If you press too much, no problem…just use your
tweezers to pull it evenly back up. The
distance between the layers in this print is anywhere from 1/16-1/32nd”.
{a judgment call for each print you may be doing} {hint…when you are
applying the layers, stand above the print and look directly down above it. If
you look at it while it is flat on the table you may not get it directly on top
of the bottom picture since you would be looking at it from an angle.} *After
you complete the first 3-D layer of the print…cut out sections of the 3rd
print. This time you will not need all the sections as you did before, cutting
out only the closer objects in the print. Adjust accordingly to the print you
may use. *This dries completely in about 2 hours….
Use your back button to return to Craftroom for additional projects Contributed by: rosebuds
|
|
Send mail to webmaster
with questions or comments about this web site. |